How to Design to Volume
A large proportion of my consultancy work is in Packaging Design, particularly designing plastic bottles which can have wildly creative shapes, but need to conform to many technical requirements, in particular a specified volume. The design process ends up being very iterative, so this tutorial shows you how to accurately calculate volumes for your design and provides some tips to speed up the iterations.

Tools & Techniques for Volume Calculations
The main tools I use are the Stitch tool for preparing my models and the Mass Properties for measuring volumes. In addition, I’ll use the Surface Normal tools to check and modify my surfaces.

The Mass Properties tool requires two things to be able to guarantee a correct volume calculation :
- That you have a set of ‘closed’ surfaces that represent a solid object
- That all the surface normals are unified, ideally pointing outwards from the surfaces.
One approach is to adjust all your surface normals, and have faith in your gap-free modelling. However if there is a problem which causes an incorrect volume calculation, the Mass Properties tool won’t display any error, it will just give a wrong value. The worst situation is where this value is only slightly wrong, in which case you don’t notice the error and could be very embarrassed when a tiny or huge model comes out of the rapid prototyping machine.
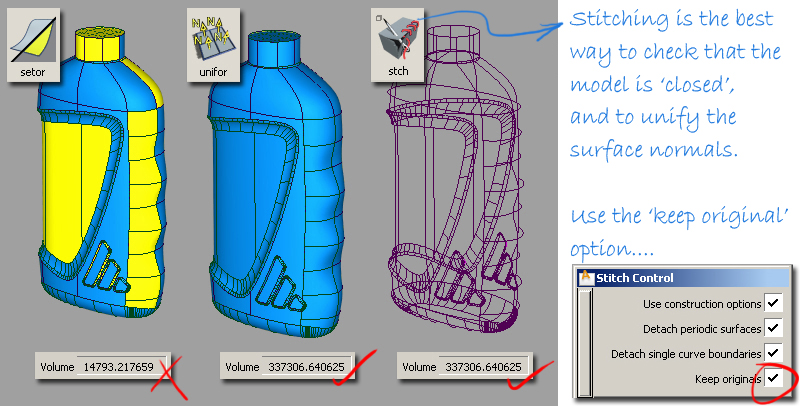
All packaging designers I work with choose to use the Surface Edit > Stitch > Shell Stitch tool to check the surfaces for gaps and to unify all the normals at the same time. This gives them the confidence that the volume tool will measure the model accurately. I use the ‘Keep originals’ option to make a stitched copy of the surfaces for measurement, but which leave my originals unchanged for further modelling and development.
Stitching & Tolerances
It’s not essential that the stitch is 100% closed, and if necessary you may choose to lower the construction tolerances to help avoid the yellow edges. The Volume tool seems quite tolerant of very small gaps. The real problem though is confidence - how do you know that the gaps have not influenced the result? Most designers therefore will want to achieve a fully stitched model even if it is to looser tolerances.
As a workflow, I will tend to build to tight Construction Options tolerances (Pro/E or Catia V5), and then relax the stitching tool tolerance. The tolerance value in the Mass Properties option box suggests that stitching at 0.01 tolerances should be adequate and so I will use this setting for stitching when I want to calculate volume.

Interpreting the Results
If you are working in millimetres, then the Volume tool returns its results in cubic millimetres. Whilst this is a perfectly valid measure, we are more used to specifying liquids in millilitres. To convert cubic millimetres into millilitres, divide by 1000 or just move the decimal three places to the left.

What Volume to Calculate?
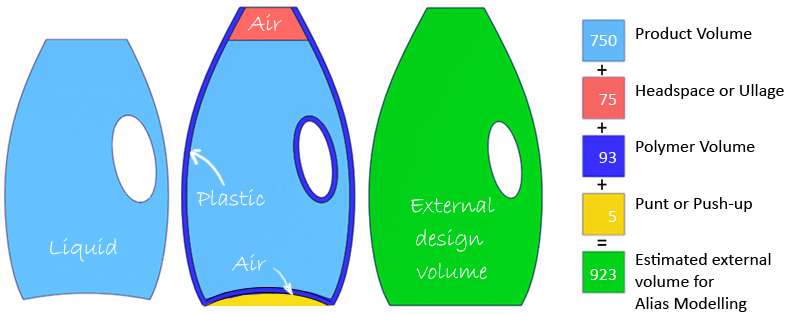
When designing a blow-moulded plastic bottle, it is impractical to try to model or accurately calculate the wall thickness, as this will vary due to the low-cost nature of the manufacture. The approach we take therefore is to make an estimate of all the elements to reach a target volume for an external surface.
This means that I can model just the external shape, and avoid doubling my workload with offsets to create the inner wall. I’ll use a Planar surface to close off the top of the pack to create a closed volume.
Iterations
If you don’t work in the packaging industry, you might think that finishing the model is simply a matter of scaling it to achieve the desired volume. If only! Unfortunately, many other constraints apply, such as a fixed neck diameter, height, width and depth restriction, ergonomic handle size, label area. So each iteration becomes a re-design, and a re-building of the model.
So the problem we have is that ideally I want to work quickly (and dare I say it sloppily?) to explore many iterations. But, the volume tool is fussy, and needs the surfaces to be stitched up which requires accurate working. The following are some techniques I use to accelerate the process.
Simplified Models
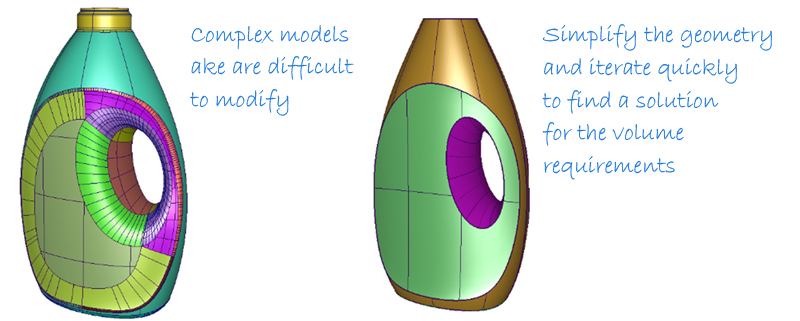
Try to create a simplified version of the design which can be easily modified to quickly explore volume options and narrow down to within 10% of a solution.
Although the final model will have all the details modelled as separate surfaces, this is too complicated to modify quickly during the concept design phase.
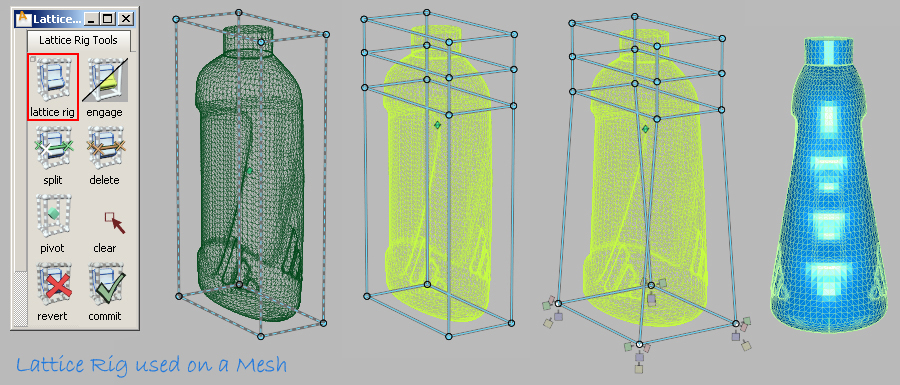
Transformer Rigs and Meshes
One way to explore different solutions to a volume problem is to use the Lattice or Transformer rigs. However, while they try to keep continuity between surfaces, it is rare that a NURBS model will stitch after it has been modified, which means you can’t check the volume.
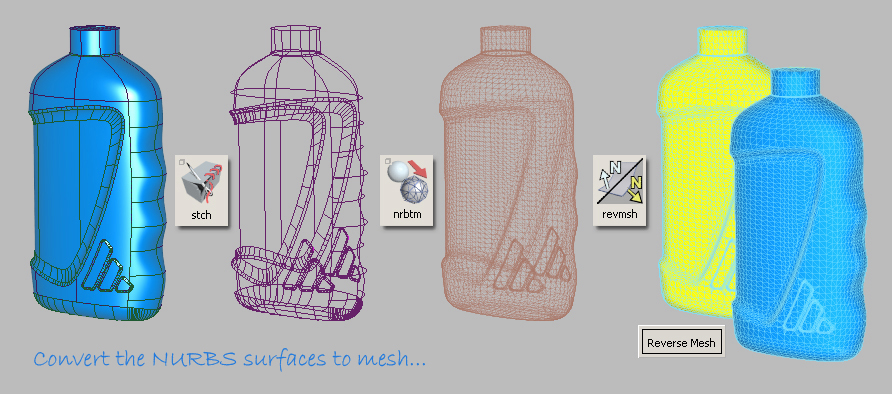
The key to using these successfully came when the volume tool was updated to calculate volumes on meshes. The benefit of meshes is that however you modify them with the Transformer Rigs, they remain a coherent ‘solid’ that will give accurate volume readings.
In this example I used the Lattice Rig to explore how angling the label would affect the volume.
Obviously, I use these iterations for problem solving and exploring. If I find a good solution, I then need to modify or re-build my NURBS surfaces to match it. But I prefer to do this once, than have to do it each time I want to try a different idea.
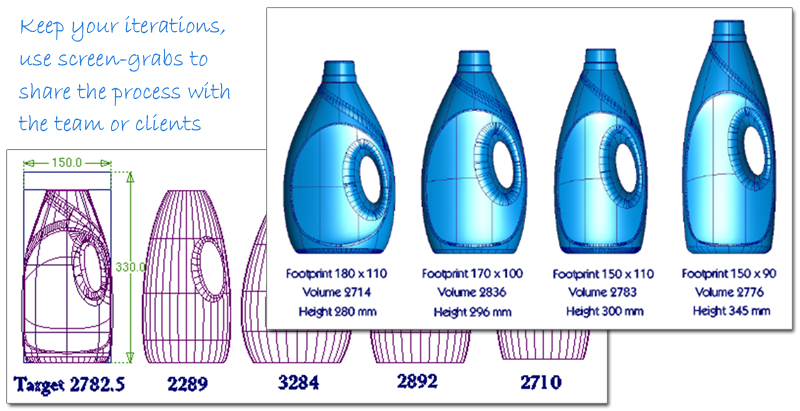
Record and Present iterations
Particularly if you are working in a team, it is useful to record and present your iterations. Sometimes just crunching the numbers feels like going round in circles, and you need some aesthetic inspiration. Letting the team sketch and brainstorm can provide welcome relief from trying to hit your volume target.
Also, by showing different alternatives, you may be able to get some leeway on the constraints you’ve been given by client, by demonstrating that you have fully explored the range of possible solutions.
Conclusion
The key to making volume calculations work consistently and accurately in AliasStudio is to use the Stitch tool to check for gaps and to unify the normals. The ability to calculate volumes on mesh models now gives a lot more freedom to quickly explore and present alternative solutions.
For me, the best workflow is to mentally split my task into two stages : First I solve the volume and constraints, modelling quickly with simplified surfaces or meshes and iterating until I reach a feasible design. Second, I will switch from problem-solving mode to surface modelling mode and build a detailed model, with hopefully only a few iterations to reach an elegant final solution.
Kerry Kingston runs Bluesmith Ltd., an Alias Consultancy and Training company based in the UK.